Are you struggling to reduce nodes in Rhino3D and streamline your 3D models? Simplifying node structures can transform your workflow, making designs cleaner and CNC machining more precise.
As a CNC processing expert, I’ve seen how optimized Rhino3D models lead to faster, high-quality production. In this guide, I’ll share proven techniques to simplify curves, cut down nodes, and enhance your models using Rhino3D and Grasshopper.
Whether you’re a designer, architect, or engineer, you’ll discover step-by-step methods to optimize models without sacrificing quality. Ready to boost efficiency and prepare your designs for flawless CNC results? Let’s get started!
Understanding Nodes in Rhino3D
In Rhino3D, nodes refer to the control points that define curves, surfaces, and meshes. These points determine the shape and complexity of your model. The more nodes you have, the more detailed—and often heavier—your model becomes. While high detail can be necessary for certain designs, excessive nodes can slow down workflows, especially when preparing files for CNC machining.
Nodes impact how smoothly curves and surfaces behave and affect file size and toolpath calculations. In CNC workflows, too many nodes can cause longer processing times and increased machine wear. Simplifying nodes helps ensure efficient, precise toolpaths without sacrificing essential shape details.
Common scenarios for reducing nodes include:
- Preparing curves for CNC cutting or milling
- Optimizing 3D models before exporting to CAM software
- Cleaning up imported geometry with complex mesh nodes
- Simplifying designs to improve Rhino3D performance
Understanding nodes and their role early will help you balance model fidelity with practical needs in CNC machining and digital fabrication.
Step by Step Methods to Reduce Nodes in Rhino3D
Reducing nodes in Rhino3D can be straightforward if you know the right tools and techniques. Here’s how I usually approach it:
Using Rhino3D Built-In Tools
- Rebuild Command: This is your go-to for simplifying curves and surfaces. It lets you set a lower point count which reduces nodes while keeping the overall shape.
- SimplifyCrv: Great for cleaning up curves by removing unnecessary control points without changing the shape much.
- MergeAllEdges: Helps reduce edge nodes on surfaces by merging adjacent edges, which is useful for cleaner models.
- ReduceMesh: If you’re working with meshes, this tool can lower polygon count by reducing mesh nodes, making models lighter for CNC workflows.
Grasshopper for Advanced Node Reduction
Grasshopper is perfect if you need parametric control over node reduction. You can:
- Create scripts to automate node simplification on complex geometries.
- Use plugins like Kangaroo or Weaverbird to optimize and smooth out meshes and curves.
- Explore custom algorithms that allow dynamic control over node count based on CNC machining needs.
Manual Node Editing Techniques
Sometimes, hands-on editing gives the best results:
- Use the PointEdit tool to manually delete or move control points on curves and surfaces.
- Check for unnecessary points causing kinks or bumps and remove or adjust them to simplify your model.
- Break apart complex curves and carefully rebuild simpler versions in critical areas.
Plugins and Third-Party Tools
There are solid plugins available to boost node optimization:
- RhinoResurf: Helps rebuild clean surfaces from meshes, reducing node complexity.
- MeshLab: An external tool that pairs well with Rhino for optimizing mesh nodes efficiently.
- PanelingTools: Useful for optimizing panel layouts with simplified geometry.
Using a mix of these tools based on your project helps keep models light and CNC-ready without sacrificing quality.
Best Practices for Node Reduction
When reducing nodes in Rhino3D, it’s important to find the right balance between simplifying your model and keeping its original shape. Too much reduction can distort curves or surfaces, which impacts the quality of your CNC machining.
Here are some best practices to follow:
-
Balance reduction with model fidelity
Always check if your model still looks and functions as intended after node reduction. Focus on keeping critical details that affect the final product, especially for CNC precision.
-
Check model integrity regularly
Use Rhino3D’s analysis tools to spot gaps, overlaps, or irregularities caused by node removal. This prevents issues during CNC toolpath generation.
-
Save backups before major changes
Before doing any node reduction, save a copy of your original model. This way, if something goes wrong, you can easily go back without losing work.
-
Tailor node reduction for CNC requirements
Consider what your CNC machine needs—sometimes a simpler model with fewer nodes speeds up toolpaths without sacrificing accuracy. Make adjustments based on your specific machining goals.
Following these tips ensures your Rhino3D model stays clean, optimized, and ready for smooth CNC machining. For more on preparing Rhino3D models that work well in CNC, check out our guide on how to prepare an L bracket in Rhino3D.
How Node Reduction Enhances CNC Machining
Reducing nodes in Rhino3D directly improves CNC machining by making the models cleaner and easier to work with. Fewer nodes mean simpler, smoother curves and surfaces, which translates into more efficient and precise CNC toolpaths. This helps the CNC machine run faster, with less wear on tools, and reduces the chances of errors during cutting.
At HYCNC, we rely on optimized Rhino3D models with reduced nodes to deliver the best results. Cleaner geometry allows our CNC programmers to generate toolpaths that are more accurate and easier to control. This not only speeds up production but also improves the overall quality of the final parts.
For example, a recent project involved cutting a complex metal bracket. The original Rhino3D model had thousands of unnecessary nodes, causing the toolpaths to be choppy and inefficient. After using node reduction techniques to simplify the curves, CNC programming became smoother and the machining time dropped by 30%. Plus, the parts came out cleaner with tighter tolerances.
In short, investing time in Rhino3D node optimization improves CNC precision, saves time, and cuts costs—making it a smart move for anyone working in CNC machining services.
Troubleshooting Common Node Reduction Issues
When reducing nodes in Rhino3D, you might run into some common problems like gaps, distortions, and performance slowdowns. Here’s how to handle them:
Fixing Gaps and Distortions
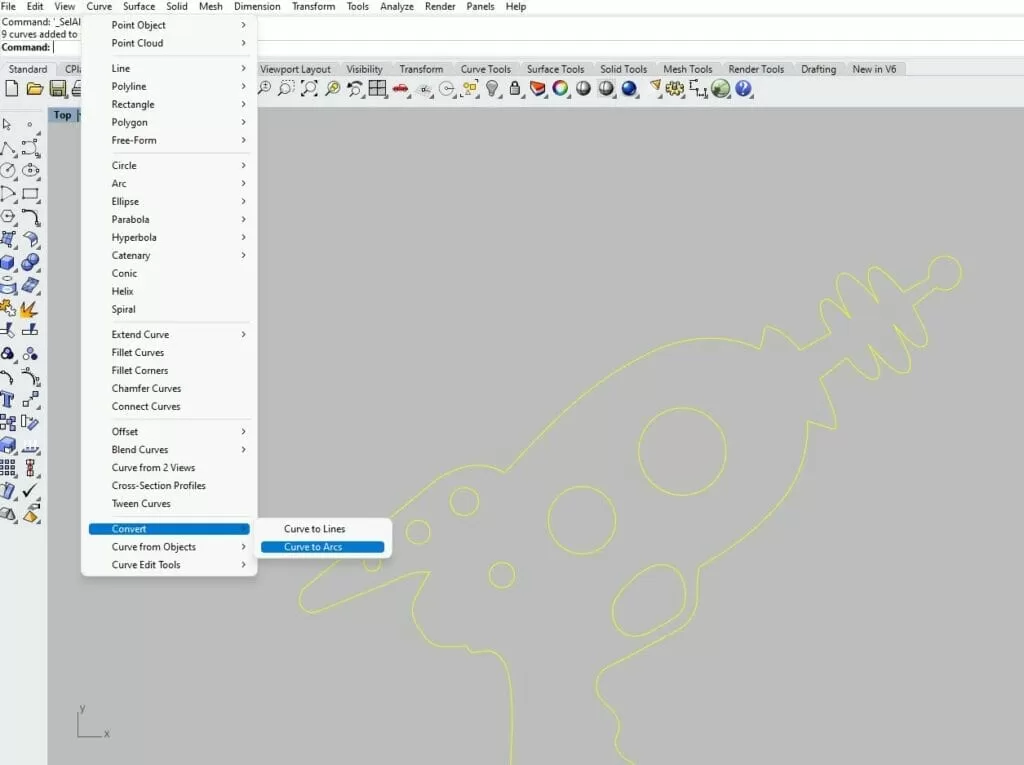
- Check for naked edges: Use the ShowEdges command to find gaps or open edges in your model. Closing those helps avoid issues when reducing nodes.
- Rebuild curves carefully: When you use the Rebuild command to simplify curves, keep an eye on changes to the shape. Too aggressive a rebuild can cause distortion. Adjust the point count gradually.
- Use Match and Join: After simplifying, use Match to align curve end tangents and Join to combine segments, sealing gaps and smoothing transitions.
Managing Complex Imported Geometry
- Imported models from other CAD software often have too many or messy nodes. To manage this:
- Simplify in stages: Don’t try to reduce all nodes at once. Work on smaller sections of the model for better control.
- Convert mesh to NURBS carefully: When working with meshes, use MeshToNurb selectively. Meshes converted to NURBS tend to get very dense with nodes.
- Clean up with SelBadObjects: Identify and fix problematic geometry before node reduction.
Performance Tips for Large Projects
- Large models can slow Rhino down, especially during node optimization. To improve performance:
- Work on blocks or layers: Hide or isolate parts of the model you’re not editing to reduce system load.
- Save backup copies often: Keep versions so you can revert if node reduction causes issues.
- Use lightweight curves and surfaces: Replace heavy or redundant geometry with simpler elements when possible.
- Explore Grasshopper for automated batch reductions, which can simplify large data sets more efficiently.
By keeping these tips in mind, you can smooth out node reduction troubles and keep your Rhino3D models CNC-ready and efficient. For more on optimizing Rhino3D models for CNC machining, check out our guide on preparing an L bracket in Rhino3D.
FAQs About Reducing Nodes in Rhino3D
What are nodes and why do they matter?
Nodes are the control points that define the shape of curves and surfaces in Rhino3D. Having too many nodes can make your model heavy and slow to work with, especially when preparing for CNC machining. Reducing nodes helps streamline the model while keeping its shape intact.
How can I reduce nodes without losing quality?
Use Rhino3D’s built-in tools like the Rebuild command or the SimplifyCrv command to lower node counts without noticeable changes. Manual tweaking also works by deleting unnecessary points and adjusting the curve. Always check your model for accuracy after reduction.
What role does Grasshopper play in node reduction?
Grasshopper is great for advanced parametric control. You can automate node reduction across complex shapes, ensuring smoother curves and optimized geometry. It’s especially useful if you want to maintain specific design constraints while simplifying the model.
What are the best Rhino3D tools for working with curves?
Commands like Rebuild, SimplifyCrv, and FitCrv are key for node optimization in curves. These help control how many nodes define your curves, making it easier to clean up geometry for CNC workflows.
Does HYCNC support Rhino3D models for CNC machining?
Yes, HYCNC specializes in turning optimized Rhino3D models into precise CNC parts. We recommend cleaning up your nodes to make your files CNC-ready. Check out our guide on preparing an L bracket in Rhino3D for CNC as a starting point here. This helps ensure smooth toolpaths and accurate machining results.