Understanding Sketches and DXF Files in Fusion 360
If you’re new to Fusion 360, you might wonder what exactly a sketch is and why it’s so important. In Fusion 360, a sketch is a two-dimensional drawing you create as the foundation of your 3D design. Think of it as the blueprint where you draw shapes like lines, circles, and arcs on a flat plane. These sketches are key because they define profiles that can be extruded, revolved, or otherwise turned into 3D parts.
When it comes to CNC machining, laser cutting, or waterjet cutting, the DXF file format plays a crucial role. A DXF (Drawing Exchange Format) is a simple, widely accepted 2D CAD file that translates your sketch into a format machines can read. This makes it perfect for sending your design to CNC machines or laser cutters—most CNC workflows depend on DXF files to accurately cut or engrave parts.
Common use cases for DXF exports include:
- Laser cutting sheet metal, plastics, or wood
- CNC routing parts from flat stock
- Waterjet cutting complex profiles
- Etching and engraving details on various materials
For those using HYCNC’s services, properly preparing your sketch in Fusion 360 before exporting as a DXF is vital. Clean, well-constructed sketches ensure your parts will cut exactly as expected, preventing costly delays or errors in production. Taking extra time to create neat, closed profiles and avoid unnecessary geometry means smoother CNC processing and better results.
Step-by-Step Guide Creating a Sketch in Fusion 360

Getting your sketch ready the right way is key for smooth CNC work with HYCNC. Here’s how to create and prepare a sketch in Fusion 360 for export to DXF.
Set up your Fusion 360 workspace
- Open Fusion 360 and start a new design.
- Before you begin, double-check your units. Most CNC jobs use either inches or millimeters, so pick whichever fits your project and is required by HYCNC.
Create and activate your sketch
- Click on the Sketch dropdown and choose “Create Sketch.”
- Select a plane or planar surface to work on. This could be the XY, XZ, or YZ plane, or a flat face on an existing model.
Build your sketch with drawing tools
- Use line, circle, arc, rectangle, and other basic drawing tools to outline your shape.
- If your design needs details from 3D features, use the Project tool to bring those edges into your sketch for accuracy.
- Keep your sketch clean and simple. Avoid clutter and unnecessary construction lines because these don’t export well and may confuse CNC software.
Best practices for sketch quality
- Use the Project tool for precise edges rather than redrawing geometry.
- Make sure every shape you want cut is a closed profile—no gaps or open curves. CNC machines need fully closed loops to interpret cut paths correctly.
- Avoid having overlapping lines or multiple profiles stacked on each other, as this can cause errors when exporting to DXF.
By setting your workspace properly, choosing the right units, and keeping sketches clean and closed, you’ll save time and hassle when it’s time to export your Fusion 360 sketch to DXF.
Exporting Your Sketch to DXF in Fusion 360
Once your sketch is ready, exporting it to a DXF file in Fusion 360 is straightforward. Here’s how to do it:
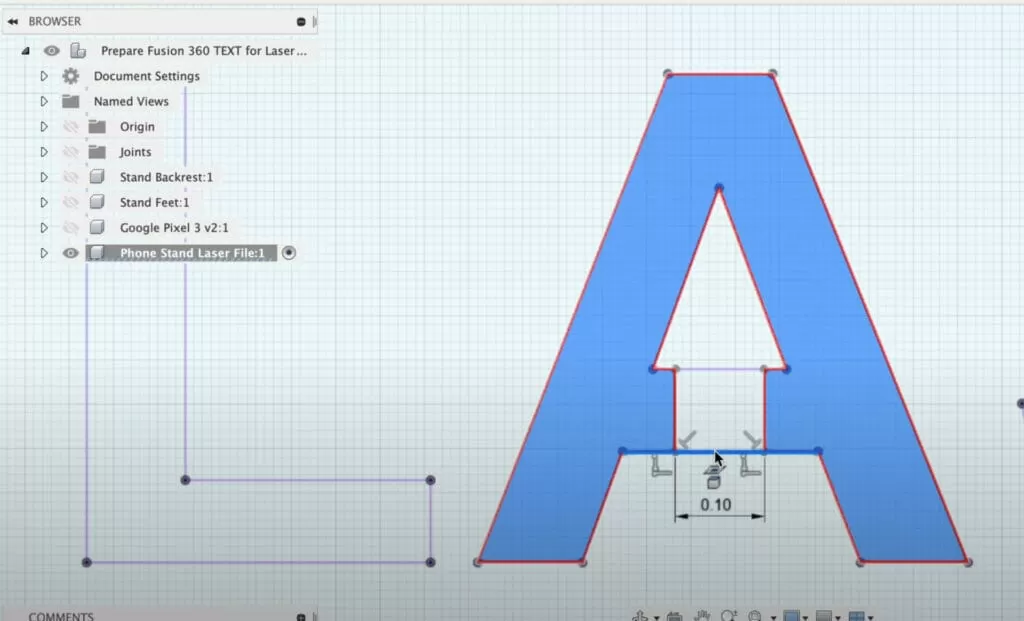
- Find your sketch in the Fusion 360 Browser panel on the left side. It’s usually listed under the Sketches folder of your active design.
- Right-click on the sketch name and select Save as DXF from the menu.
- Choose a location on your local drive to save the file, and give it a clear, descriptive name for easy identification.
After saving, it’s important to verify your exported DXF:
- Open the DXF in Fusion 360 by creating a new design and using the Insert > Insert DXF option, or open it in graphics software like Adobe Illustrator or Inkscape.
- Check for unwanted geometry, such as construction lines that shouldn’t be there, or any open segments that could cause issues during CNC cutting.
If you encounter problems, here are quick tips for common issues:
- Missing geometry or open paths: Review your sketch in Fusion 360 to ensure all profiles are closed before export.
- Incorrect scale or units: Double-check your units in Fusion 360 before exporting. The DXF will carry those unit settings, so setting inches vs. millimeters correctly is key.
- Multiple sketches or components: Export each sketch separately or combine them carefully in one DXF if required, making sure no overlaps or conflicting lines appear.
Following these steps helps ensure your DXF file is clean, accurate, and ready for CNC machining or laser cutting with HYCNC.
Optimizing DXF Files for HYCNC’s CNC Services
When you’re ready to send your DXF file for CNC machining or laser cutting with HYCNC, knowing their file requirements can save you time and avoid costly mistakes. Here’s what you need to keep in mind to optimize your DXF for HYCNC’s services:
Supported File Formats
HYCNC accepts several common vector formats, including:
- DXF (preferred for most CNC workflows)
- DWG
- AI (Adobe Illustrator)
- EPS
Sticking with these formats ensures your design is compatible and easy to work with on their machines.
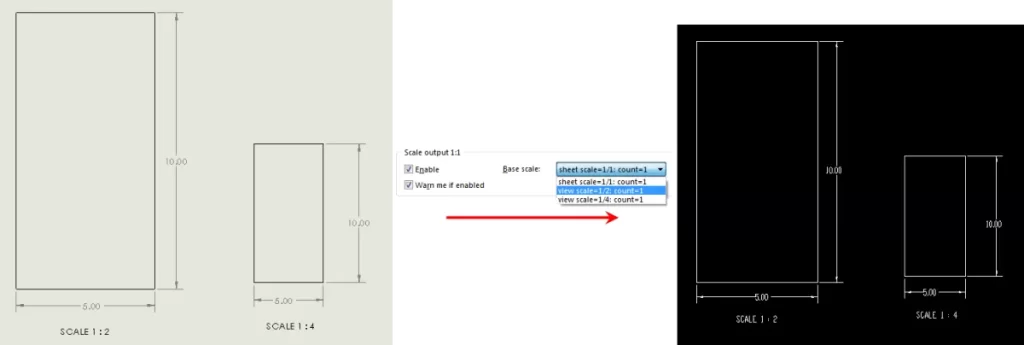
Scale and Units
- Your DXF file should be at 1:1 scale — what you design is what you get.
- Use consistent units, either inches or millimeters, matching your Fusion 360 setup.
- Before exporting, double-check your sketch units to avoid size mismatches during machining or cutting.
Minimum Hole and Cutout Sizes
- HYCNC machines have minimum size limits for holes and internal cutouts to maintain precision and avoid material damage.
- Always review the minimum sizes listed on HYCNC’s website or ask their support team if unsure.
- Design your holes and cutouts with these limits so your parts are manufacturable without delays.
Preparing Your DXF for Upload
- Clean up your sketch by removing unnecessary lines and ensuring all profiles are fully closed for CNC compatibility.
- Name your file clearly, especially if submitting multiple parts — this helps streamline quoting and production.
- Use HYCNC’s instant pricing tool on their platform to upload your DXF and get a quick quote.
Tips for Precision and Compatibility
- Avoid using construction lines or hidden geometry in your exported DXF.
- Use the Project tool in Fusion 360 to accurately transfer any needed edges or references into your sketch before exporting.
- Check your exported DXF in another program like Adobe Illustrator or Inkscape to catch any open paths or strange elements well before submission.
By following these guidelines, you’ll get faster quotes and smoother production with HYCNC’s CNC machining and laser cutting services, guaranteeing your parts turn out exactly as designed. For more details on DXF export options, you might also find this helpful: 4 ways to export a DXF from Fusion 360.
Alternative Methods for DXF Export in Fusion 360
Fusion 360 offers a few different ways to export DXF files beyond just right-clicking your sketch. One good option is exporting from Flat Pattern mode if you’re working with sheet metal parts. This lets you export the flattened layout of your metal design as a DXF, which is perfect for laser cutting or CNC routing flat pieces.
It’s generally best to avoid using the general File > Export option for DXF, especially from 3D models. This method often creates files with extra 3D data or unexpected geometry, which can cause problems when you send your DXF to CNC machines. Fusion 360’s sketch-based DXF export is cleaner and more reliable.
You can also export DXF files from the 2D Drawing workspace, which is helpful if you want to create detailed drawings. But keep in mind, this method has some downsides:
- It might include extra annotations or dimensions you don’t want in your cutting file
- Scale and unit settings can sometimes get tricky to manage
- Not ideal for quick sketch exports meant just for CNC cutting
For most CNC and laser cutting projects, sticking to exporting the DXF directly from your sketch or the Flat Pattern view for sheet metal keeps things simple and ensures your files work smoothly with services like HYCNC.
Common Mistakes to Avoid
When you create and export a sketch to DXF from Fusion 360, steering clear of a few common pitfalls can save you time and prevent errors during CNC machining or laser cutting.
-
Exporting sketches with construction lines
Construction lines are meant as guides and don’t cut or engrave, but if exported, they can confuse machines or your CNC service. Before exporting, make sure to hide or delete these lines to keep your DXF clean.
-
Ignoring unit settings or scale
Mixing up inches and millimeters is a frequent issue. Always double-check your design units in Fusion 360 before exporting. The DXF should match the unit system specified by your CNC provider to avoid parts being cut the wrong size.
-
Not verifying the DXF file before submission
After exporting, open your DXF file in software like Adobe Illustrator or even back in Fusion 360 to inspect it. Confirm there aren’t any open paths or missing lines that could cause machining errors.
-
Overcomplicating sketches with unnecessary geometry
Having too many extra lines, overlapping shapes, or details that won’t be cut can slow down processing and confuse CNC machines. Keep your sketches simple and focused on what needs to be cut or engraved.
Avoiding these mistakes will help ensure your DXF files from Fusion 360 are clean, accurate, and ready for smooth processing with HYCNC’s CNC machining and laser cutting services.
How HYCNC Can Help with Your CNC Projects
HYCNC offers reliable CNC machining and laser cutting services tailored to your DXF-based projects. Whether you’re working on custom parts, prototypes, or production runs, HYCNC handles your files with precision and speed, making the manufacturing process smooth and hassle-free.
Benefits of Using HYCNC for DXF Projects
- High accuracy and quality: Your DXF files are processed with tight tolerances to ensure parts come out exactly as designed.
- Wide range of materials and thicknesses: From metals to plastics, HYCNC supports many materials suitable for CNC machining and laser cutting.
- Instant pricing and fast turnaround: Upload your DXF and get a quick quote—no waiting around.
- Easy file handling: HYCNC accepts DXF files prepared in Fusion 360, saving you time on file conversion and adjustments.
Uploading Your DXF File to HYCNC
- Visit HYCNC’s online platform.
- Choose the CNC machining or laser cutting service.
- Upload your Fusion 360-exported DXF file.
- Specify material, thickness, and quantity.
- Get an instant price quote for your project.
Support and Assistance
If you run into file prep issues or want to ensure your DXF meets HYCNC’s requirements, their support team is ready to help. They can guide you through sketch clean-up tips, unit adjustments, and other common hurdles—so your project moves forward without a hitch.
FAQs about Exporting DXF from Fusion 360
Can I export a DXF from the free version of Fusion 360?
Yes, you can export DXF files even with the free Fusion 360 license. The sketch to DXF export feature is available to hobbyists and startups, so you’re good to go without a paid subscription.
How do I ensure my DXF is compatible with HYCNC’s CNC machines?
Make sure your sketch has clean, closed profiles and is drawn at a 1:1 scale using the correct units (inches or millimeters). Avoid construction lines, double-check for open paths, and save your DXF directly from the sketch. HYCNC accepts well-prepared DXF files optimized for laser cutting and CNC machining, so following these steps helps ensure smooth processing.
What should I do if my DXF file has open segments?
Open segments can cause issues during cutting or machining. To fix this, go back to your Fusion 360 sketch and ensure all lines and shapes are fully closed. Use the Project tool if needed to align geometry and double-check edges. After fixing, export a fresh DXF and recheck it in a viewer like Inkscape or Adobe Illustrator before submitting to HYCNC.
Can I include multiple parts in one DXF file?
Yes, you can place multiple parts in a single sketch on different positions within the same plane and export them together in one DXF file. Just maintain clear spacing between parts to avoid confusion during CNC cutting. If your parts are from different components, combine their sketches first, or use a layout in a 2D drawing workspace.
How do I change units in Fusion 360 for DXF export?
Before creating your sketch, set the correct units for your project in Fusion 360 under Document Settings. You can switch between millimeters and inches. Confirm units match your CNC requirements before exporting your DXF, because unit mismatches cause inaccurate sizes when sent to services like HYCNC.