Why Export DXF Files from Fusion 360
If you’re wondering why exporting a DXF file from Fusion 360 matters, you’re not alone. DXF files are essential for transferring your designs to CNC machines, laser cutters, and other manufacturing tools that rely on vector-based data. Fusion 360 is a powerful CAD tool, but many CNC workflows require DXF files because they contain precise 2D outlines that machines can follow easily.
Exporting DXF from Fusion 360 lets you:
- Share precise 2D geometry – Perfect for CNC machining, laser cutting, and plasma cutting.
- Maintain layer information and clean lines – Critical for accurate toolpaths.
- Integrate seamlessly with manufacturing software – Most CNC and laser systems import DXF formats.
- Save time in production – Ready-to-use files mean fewer errors and faster setups.
By exporting your Fusion 360 sketches or sheet metal flat patterns as DXF, you get a clean, industry-standard file format that CNC services like HYCNC can use directly. This helps avoid costly mistakes caused by incompatible file types or poor conversions.
Understanding the value of DXF export lets you optimize your workflow and ensure your designs move smoothly from digital to physical form. Later, I’ll walk you through exactly how to export DXF files, plus tips to avoid common pitfalls and get your files CNC-ready every time.
Overview of Fusion 360 Capabilities
Fusion 360 is a powerful CAD tool that combines 3D modeling, simulation, and manufacturing in one platform. For CNC machining and laser cutting, it’s especially handy because it lets you create detailed 2D sketches and 3D designs, then export those as DXF files. These DXF files are essential for many CNC workflows, making Fusion 360 a go-to choice for professionals and hobbyists alike.
The software supports both sheet metal and solid modeling, which means you can work on flat patterns or complex parts with ease. Fusion 360 also offers built-in CAM tools to generate toolpaths, but when you just need a 2D outline for cutting or engraving, exporting a DXF is the quickest and cleanest way to get your design ready for your CNC machine.
In short, Fusion 360 gives you everything you need to design, prepare, and export files – including DXF formats – ready for CNC cutting or laser engraving jobs common in US shops and manufacturing settings.
Understanding DXF Files and Their Role in CNC
What is a DXF File
A DXF file, which stands for Drawing Exchange Format, is a type of vector file used to share CAD drawings between different software programs. It’s popular because it keeps all the important line and shape information without being tied to any specific CAD platform.
When it comes to CNC machining, DXF files are essential. They contain the 2D geometry, like outlines and cut lines, needed for machines like laser cutters, plasma cutters, and CNC routers to follow and make precise cuts. Because DXF files focus on the exact paths, they help ensure the cuts come out clean and accurate every time.
In Fusion 360 CNC file preparation, exporting to DXF is a key step to make your design ready for manufacturing. Without a good DXF export, the CNC tool might misread your drawing or cut the wrong shapes. That’s why understanding what a DXF file is will help you better prepare your designs for CNC jobs and laser cutting projects.
Why Proper DXF Export Matters

Getting your DXF export right in Fusion 360 is critical, especially if you’re using the file for CNC machining or laser cutting. A clean, accurate DXF ensures your CNC machine reads the file correctly, avoiding costly mistakes or wasted materials. If your export includes extra lines, wrong scaling, or missing geometry, it can cause the machine to cut wrong shapes or miss important details.
Proper DXF export also helps keep your workflow smooth. When your files are consistent and error-free, downstream processes like nesting, toolpath generation, and machine setup become easier and faster. This reduces frustration and saves time on the shop floor.
By paying attention to how you export your DXF — whether from a 2D sketch or a flat pattern — you make sure your designs translate perfectly from Fusion 360 to your CNC software. This step might seem small, but it has a big impact on the quality and precision of your finished parts.
Recommended Methods to Export a DXF in Fusion 360
Method 1 Exporting from a 2D Sketch
Exporting a DXF file from a 2D sketch in Fusion 360 is one of the simplest and most common methods. This is especially useful for CNC machining and laser cutting tasks, where precise 2D outlines are needed.
Here’s how I export a DXF from a 2D sketch:
- Open your design and go to the workspace where your sketch is.
- Right-click on the sketch you want to export in the Browser panel on the left.
- Select “Save as DXF” from the dropdown menu.
- Choose the destination folder on your computer and save the file.
This method keeps only the sketch geometry, making it clean and ready for CNC software. It works great if you’re working on flat parts or profiles and want a quick, straightforward export.
Tips for best results:
- Make sure the sketch is fully constrained and free of overlapping or unnecessary lines.
- Double-check the units in Fusion 360 before exporting to avoid scale issues.
- Use this method when you need just the outline for cutting or engraving without any 3D details.
Exporting DXF from the 2D sketch gives you clean, reliable files, perfect for most CNC and laser cutting workflows in the US market.
Recommended Methods to Export a DXF in Fusion 360
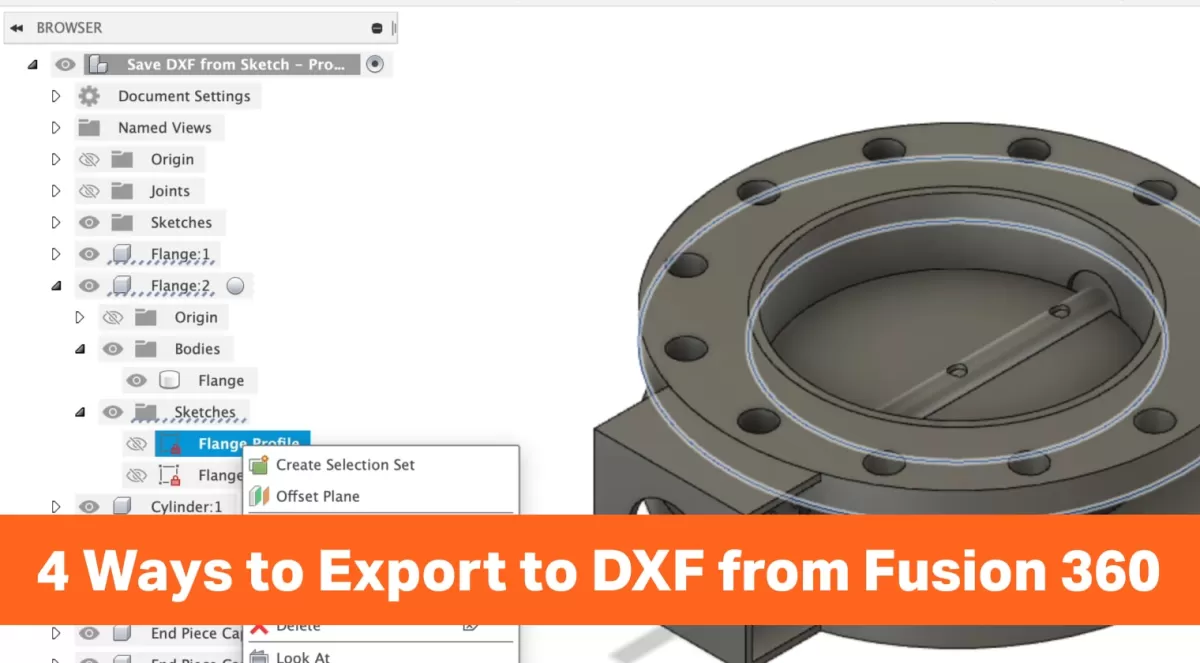
Method 2 Exporting from a Flat Pattern Sheet Metal
When working with sheet metal parts in Fusion 360, exporting a DXF from a flat pattern is one of the cleanest ways to get your design ready for CNC cutting or laser work. This method is especially useful because it captures the unfolded shape of your part exactly as it will be cut from the sheet.
Here’s how to export a DXF from a flat pattern in Fusion 360:
-
Create or open your sheet metal design.
Make sure your sheet metal model is complete and ready for unfolding.
-
Activate the Sheet Metal workspace.
Switch to the Sheet Metal environment where you can access flat pattern tools.
-
Generate the flat pattern.
Right-click on the “Flat Pattern” in the browser tree and choose “Create Flat Pattern” if it’s not already active.
-
Right-click the flat pattern and select “Save as DXF.”
This option directly exports the flat layout as a DXF file, which can be used with CNC machines or laser cutters.
-
Choose the save location and confirm.
Pick a folder on your computer, name your file, and save.
Using the flat pattern export ensures your DXF reflects accurate bend lines, cutouts, and overall geometry without any extra sketch data cluttering your file. This method is preferred for sheet metal parts destined for CNC machining or laser cutting and works well with most CNC software, making your workflow smoother and more reliable.
Recommended Methods to Export a DXF in Fusion 360
Methods to Avoid
When exporting a DXF file from Fusion 360, there are a few methods that often cause issues or extra work later on. Here’s what to steer clear of to save time and headaches:
-
Exporting 3D Bodies Directly as DXF
DXF files are meant for 2D geometry. Trying to export a 3D model or body as a DXF usually results in incomplete or unusable files. Stick to exporting sketches or flat patterns instead.
-
Using Screenshot or Print-to-PDF Hacks
Some users try to create DXF files by printing or screenshotting sketches, then converting them outside Fusion 360. This leads to poor quality files that won’t work well for CNC or laser cutting.
-
Ignoring Units and Scale Settings
Exporting without double-checking that your design is in the right units (inches or millimeters) often causes sizing mistakes. Don’t forget to verify units inside Fusion 360 before export.
-
Skipping Cleanup of Sketches
Exporting overly complex or messy sketches directly leads to DXF files with unnecessary lines or shapes. Clean up your sketches first by removing construction lines and overlapping geometry.
Avoiding these methods will help ensure your DXF exports from Fusion 360 are clean, precise, and ready for CNC machining or laser cutting right out of the box.
Troubleshooting Common DXF Export Issues Unwanted Geometry in DXF Files
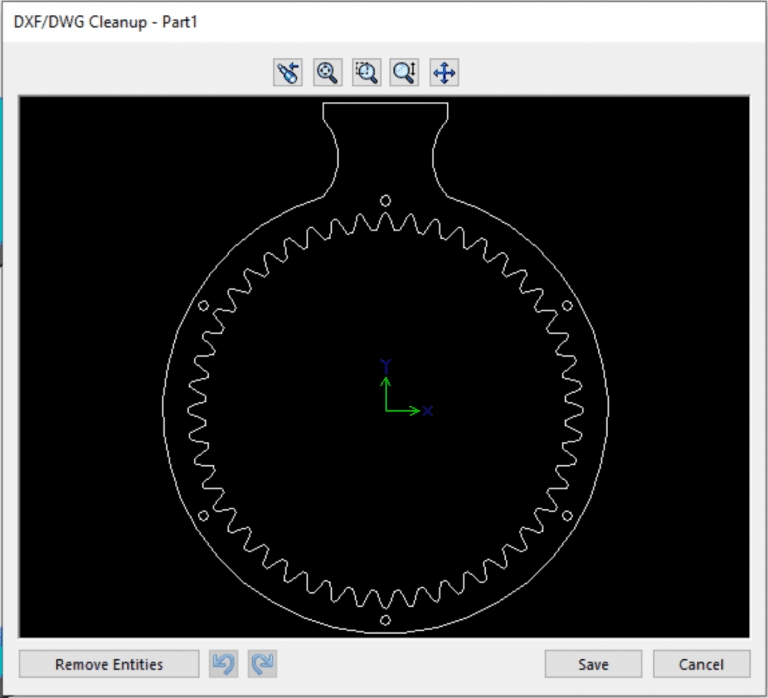
One common problem when exporting a DXF from Fusion 360 is ending up with unwanted lines or shapes in your file. This extra geometry can mess with your CNC machining or laser cutting, causing mistakes or delays.
Here’s why unwanted geometry shows up and how to fix it:
- Hidden or Construction Lines: Sometimes construction lines or hidden layers get included. Make sure to hide or delete these before export.
- Overlapping Sketches: If multiple sketches overlap or intersect, Fusion 360 might export all layers, adding clutter.
- Project or Reference Geometry: Lines used only for reference, like projected edges, often sneak into the DXF. Double-check your sketches and clean out anything unnecessary.
- Unused Profiles: Sketch profiles that aren’t fully closed or intended for export can also appear. Close loops properly and remove extra profiles.
To avoid these issues, I recommend cleaning your sketches before exporting:
- Turn off or delete construction and reference geometry.
- Confirm only the sketch you want is visible.
- Use the “Select All” and delete any stray lines.
- Zoom in to check for tiny bits of geometry that might not be obvious.
A clean DXF file improves compatibility with CNC software and reduces troubleshooting later. If you’re using Fusion 360 for CNC or laser cutting, keeping your sketches tidy before export saves time and headaches.
Troubleshooting Common DXF Export Issues Scaling and Unit Issues
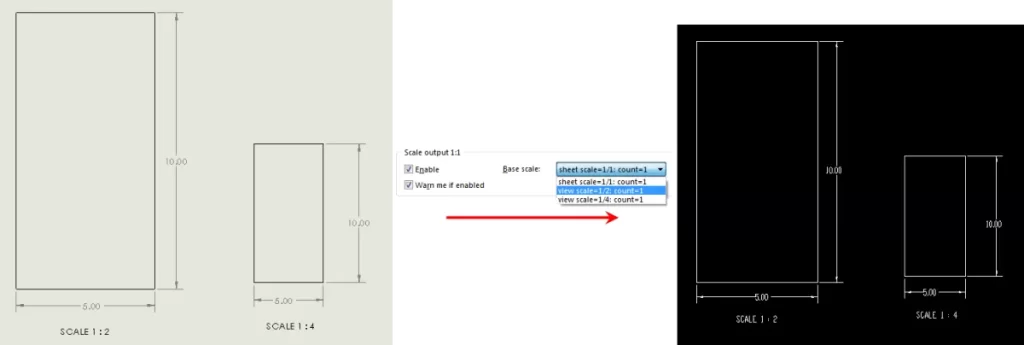
One of the most common headaches when exporting DXF files from Fusion 360 is dealing with scaling and unit mismatches. If your DXF shows up at the wrong size in your CNC or laser cutting software, the problem often comes down to units. Fusion 360 lets you design in inches or millimeters, but the DXF might default to something else when exported.
To avoid this:
- Double-check your document units in Fusion 360 before exporting by going to the “Document Settings” at the bottom of the browser.
- When exporting your DXF, make sure you’re exporting the sketch or flat pattern in the correct units.
- If needed, adjust units inside your CNC software to match your Fusion 360 setup.
Also, remember Fusion 360 sometimes exports DXF files with scaling factors applied automatically. This can cause your design to be off by 10x or 100x if your units aren’t aligned.
If scaling looks wrong, you can:
- Re-export with a different units setting.
- Use online tools or CAD software to verify and adjust the DXF scale.
- Test a simple shape export first to confirm proper sizing.
Getting the scale right is key to smooth CNC machining or laser cutting, so take a few minutes to verify units before sending your DXF file for production.
Troubleshooting Common DXF Export Issues Compatibility with CNC Software
One common headache when exporting DXF files from Fusion 360 is compatibility with your CNC software. Not all CNC programs handle DXF files exactly the same way, so your exported file might not load correctly or could cause unexpected errors on the machine.
Here’s what to watch for to avoid these problems:
-
Check DXF Version Compatibility
Fusion 360 typically exports in the AutoCAD 2000 DXF format, which works well with most CNC software. Still, some older or specialized programs may require different versions. Verify your CNC software’s supported DXF versions before exporting.
-
Simplify Geometry
Complex curves or splines in your sketch might not translate well. Convert curves to polylines or break them into smaller segments to ensure your CNC software reads them properly.
-
Use Closed Profiles
CNC machines often need closed loops to generate correct toolpaths. Make sure your sketch entities are fully closed without gaps or overlaps before exporting.
-
Units and Scale Checks
Double-check that your CNC software is interpreting the units correctly. A mismatch between Fusion 360’s unit settings and CNC software can cause scaling issues. Export with clear unit settings, and adjust CNC software import options if possible.
-
Avoid Unsupported Entities
Some CNC programs can’t handle text, hatches, or certain annotation types in DXF. Remove these elements before export to keep your file clean and CNC-ready.
If you encounter ongoing compatibility issues, consult your CNC software documentation or reach out to your machine’s support team for DXF import advice. This ensures your Fusion 360 CNC file preparation workflow stays smooth and reliable.
For more detailed tips on exporting DXF files from Fusion 360 and prepping designs for CNC, check out this Fusion 360 DXF export tutorial.
Verifying Your DXF File for CNC Machining Checking Geometry
Before sending your DXF file to a CNC machine, it’s crucial to double-check the geometry. Make sure your lines, curves, and shapes are clean and properly connected. Here’s what to look for:
- No Overlapping or Duplicate Lines: These can confuse the CNC software and cause errors.
- Closed Contours: For cutting or profiling, ensure all paths are fully closed.
- Correct Line Types: Use the right line styles—usually, CNC machines use solid lines for cutting paths.
- Simplified Geometry: Remove unnecessary details that won’t affect machining but can complicate the tool path.
- Proper Scale and Units: Confirm dimensions match what you expect before exporting to avoid size issues.
Reviewing these points saves time and prevents costly mistakes. Use your CAD software’s measuring and preview tools to spot issues early. If you want a detailed guide, check out create and export a sketch to DXF from Fusion 360 for extra tips on perfecting your files for CNC machining.
Verifying Your DXF File for CNC Machining
Preparing for HYCNC Services
Before sending your DXF file to HYCNC for CNC machining, it’s important to double-check a few things to make sure your file is ready for a smooth process. Here’s what I always look out for:
-
Clean Geometry
Make sure all lines and shapes are closed and connected properly. Open paths or overlapping lines can cause issues during cutting.
-
Correct Units
Confirm your DXF is saved in the right units (inches or millimeters) that match HYCNC’s requirements. This helps avoid any scaling problems.
-
Layer Organization
If your design has multiple layers, label them clearly or flatten the sketch to a single layer if the service prefers that. It simplifies the machining setup.
-
No Extra Elements
Remove any construction lines, text, or other non-cutting elements. These can confuse CNC tools or software.
-
File Format Check
Save the DXF in a version compatible with HYCNC’s software (asking their support about the preferred DXF version is a good step).
By taking these steps, you ensure your Fusion 360 DXF export is well optimized for HYCNC’s CNC services, reducing back-and-forth and speeding up your project delivery.
Tips for Optimizing Your Workflow
Creating Clean Sketches
When working in Fusion 360, keeping your sketches clean is key for smooth DXF export and CNC machining. Here’s what I focus on:
- Use simple geometry: Stick to basic shapes and straight lines whenever possible. Complex curves can cause issues when exporting DXF files for CNC or laser cutting.
- Avoid overlapping lines: Overlaps can confuse CNC software and lead to unwanted cuts or errors. Make sure lines connect properly without doubling up.
- Fully constrain sketches: Lock down dimensions and constraints so your design doesn’t shift unexpectedly, ensuring that your DXF export matches exactly what you designed.
- Remove unnecessary details: Delete any construction lines, points, or hidden geometry that aren’t needed in the final DXF file. This keeps your file lightweight and easy for CNC machines to read.
- Check units early: Confirm your sketch units match your CNC setup (inches or millimeters). This avoids scaling headaches later on.
By creating clean sketches in Fusion 360, you reduce the chance of errors, save time troubleshooting, and help your CNC or laser cutting services get the job done right the first time.
Tips for Optimizing Your Workflow
Streamlining for CNC and Laser Cutting
When preparing your Fusion 360 files for CNC machining or laser cutting, keeping things efficient helps avoid delays and errors. Here’s how to streamline your workflow for better results:
-
Keep sketches clean and simple
Remove unnecessary lines, overlapping geometry, or extra points. Simple sketches reduce file size and minimize confusion for CNC software.
-
Use layers and colors wisely
Organize your design elements by layers or colors to separate different cutting operations or engraving lines. This makes programming and editing easier later.
-
Set the correct units and scale upfront
Always double-check your units (inches or millimeters) before exporting. Incorrect units can cause your design to cut at the wrong size.
-
Flatten 3D models before exporting DXF
DXF files handle 2D geometry, so if you’re working with sheet metal or flat pattern designs, make sure to use the flat pattern workspace before exporting.
-
Avoid complex fills or hatches
CNC and laser cutters usually only need outlines or polylines. Fill areas may cause unexpected toolpaths or slow processing times.
-
Save sketches dedicated to DXF export
Keep a separate sketch or flat pattern specifically for DXF export. This helps you maintain your original 3D design intact and prevents accidental edits.
-
Automate repetitive tasks where possible
Use Fusion 360 add-ins or scripts designed for CNC workflows to save time on exports and file prep.
These tips will help your CNC or laser cutting projects run smoothly and reduce back-and-forth fixing. For detailed Fusion 360 DXF export tutorials and file prep tips, check out our create and export a sketch to DXF guide.
Tips for Optimizing Your Workflow Automating with Add-Ins
Using add-ins can save you a ton of time when exporting DXF files in Fusion 360. These small software helpers automate repetitive tasks, making your CNC file prep faster and less error-prone. Here’s how add-ins can boost your workflow:
- Batch Exporting – Instead of exporting sketches one by one, use add-ins that let you export multiple DXF files at once. This is a huge time saver when working on complex projects.
- Custom Export Settings – Some add-ins allow you to set your preferred units, layers, and line types in advance. That means every DXF export matches your CNC or laser cutting specs without extra tweaking.
- Error Checking – Certain tools can spot potential problems like overlapping geometry or scale mismatches before you export your DXF. This helps reduce trial and error down the line.
- Integration with CNC Software – A few add-ins can directly prepare and send your DXF files to popular CNC software, streamlining the handoff from design to machining.
To get started, check out Fusion 360’s App Store for DXF export add-ins or search for community tools tailored to your needs. Automating these steps makes your workflow smoother and your CNC projects more reliable.