Understanding Vector Files for Laser Cutting
What Are Vector Files
Vector files are digital graphics made from points, lines, and curves defined by mathematical formulas rather than pixels. Unlike raster images, vector files can be scaled infinitely without losing quality, making them ideal for precise cutting tasks. For laser cutting, these files provide clear, accurate paths that guide the laser’s movement.
Why 2D Vector Files Matter
Laser cutting machines work by following 2D paths to cut or engrave materials. Although your design might start as a 3D model, the laser needs a flat, 2D vector file to read the exact outlines. These 2D vector files ensure:
- Clean, crisp cuts without distortion
- Precise control over the cutting path
- Efficient use of material by optimizing cut lines
Converting 3D shapes into 2D vector files is essential for preparing designs that laser cutters can interpret correctly.
Common File Formats
Several file formats are commonly used to export vector files for laser cutting, including:
- DXF (Drawing Exchange Format): Widely used in CAD and CNC CNC laser cutting services; supports 2D vector paths perfectly.
- SVG (Scalable Vector Graphics): Popular for simpler designs and compatible with software like Adobe Illustrator and Inkscape.
- AI (Adobe Illustrator): Supports detailed vector paths and is preferred in professional design workflows.
- EPS (Encapsulated PostScript): Suitable for high-quality vector images and works well across different platforms.
Understanding these formats helps ensure your exported file meets the laser cutter’s requirements and avoids issues during the cutting process.
For more on designing for laser cutting, check out our detailed guide on Designing for Laser Cutting in Illustrator.
Challenges of Exporting 3D Shapes to 2D Vector Files

Exporting vector files from 3D shapes for laser cutting can be tricky. Here are some common challenges you’ll face:
Node Overload
When you convert complex 3D models into 2D vector files, you often end up with way too many nodes (points). This “node overload” can slow down file processing and mess with the laser cutter’s precision. Simplifying paths without losing important details is key to avoiding this problem.
Software Limitations
Not all design software handles 3D to 2D conversions smoothly. Some tools might not export clean vector files, causing issues like broken lines or missing details. It’s important to pick software that supports proper DXF or SVG export for laser cutting, like Fusion 360 or SolidWorks. Ignoring this can lead to wasted time fixing files later.
Material Considerations
Different materials react differently to laser cutting. When exporting files, you need to consider how your design will translate on the material—thickness, burn marks, and kerf (cut width) all play a role. Your vector file should be optimized to account for these factors to ensure clean cuts and avoid material damage.
Being aware of these challenges will save you headaches and improve your laser cutting results. For a detailed guide on exporting sketches from Fusion 360, check out our blog on create and export a sketch to DXF from Fusion 360.
Step-by-Step Guide to Exporting Vector Files from 3D Shapes
Getting your 3D model ready for laser cutting means turning it into clean 2D vector files. Here’s how to do it right:
Step 1 Choose the Right Software
Pick software that supports both 3D modeling and vector export. Popular choices include Fusion 360, SolidWorks, and even Illustrator or Inkscape for tweaking 2D files.
Step 2 Create or Import Your 3D Model
Start by building your 3D design from scratch or import your model if you already have one. Make sure it’s detailed enough for the part you want to cut.
Step 3 Extract 2D Sketches from 3D Models
Use your software’s tools to create 2D sketches—like flat outlines or cross-sections—from your 3D shape. This step is crucial because laser cutters work with 2D vector paths, not 3D data.
Step 4 Export to Vector Format
Once you have your 2D sketches, export them as vector files such as DXF or SVG. These formats are widely accepted by laser cutting software and machines.
Step 5 Verify Your File
Open your exported vector file in a program like Illustrator or Inkscape to check for any errors. Look for overlapping lines, extra nodes, or missing parts that could affect the cut.
Step 6 Optimize for Laser Cutting
Finally, clean up your vector file: simplify paths, remove unnecessary points, and set your stroke weights correctly. This helps ensure smooth cuts and prevents issues when sending your file to the laser cutter.
Following these steps gets your 3D model into a clean, laser-ready 2D vector file every time.
Best Practices for Perfect Vector Files
Getting your vector files right is key to smooth laser cutting. Here are simple tips to keep your files neat and ready:
- Keep it 2D: Make sure your file is a flat 2D vector. Laser cutters don’t read 3D models directly, so flatten your design by extracting sketches or outlines.
- Use clean lines: Avoid overlapping paths or extra nodes. Extra lines can confuse the laser and cause errors or uneven cuts.
- Stick to common file formats: Export your files in DXF, SVG, or AI format – these are widely accepted for laser cutting and CNC laser machines.
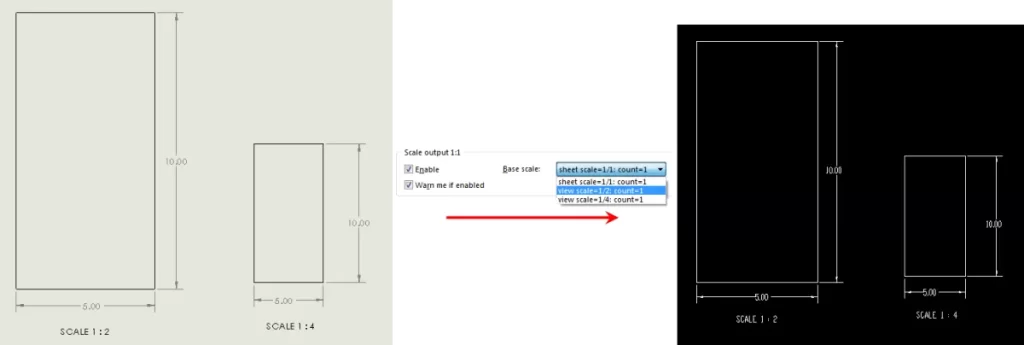
- Check scale and units: Always confirm your design is scaled correctly in inches or millimeters, matching your material size.
- Simplify the design: Remove unnecessary details. Too many tiny elements can slow down cutting and increase wear on the machine.
- Test your file: Before sending to the cutter, open the file in a vector editor like Adobe Illustrator or Inkscape to spot mistakes.
- Set proper color codes: Some laser cutters use color to distinguish cutting from engraving. Use clear colors or layers if needed.
- Optimize paths: Join continuous paths and reduce node count for smoother, faster cuts.
- Label layers clearly: Separate cutting and engraving layers, so the laser follows instructions perfectly.
Following these best practices makes sure your vector files flow smoothly through the laser cutting process, saving you time and material.
Software Specific Tips for Exporting Vector Files

When converting 3D models to 2D vector files for laser cutting, each software has its quirks. Here’s a quick guide for some popular tools:
Fusion 360
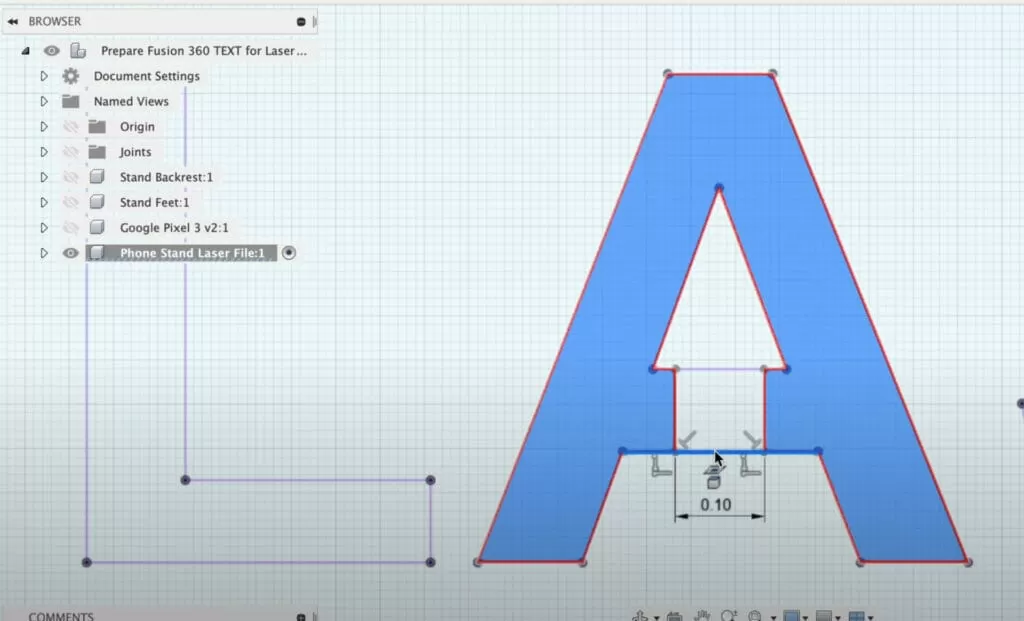
- Use the “Create Drawing” feature to make 2D views from your 3D model.
- Export the drawing as a DXF file—it’s perfect for laser cutting.
- Simplify your sketches before exporting to avoid node overload.
- Double-check line weights and delete unnecessary details.
SolidWorks
- Use the “Make Drawing from Part/Assembly” option to generate 2D projections.
- Save or export as DXF or DWG for best compatibility.
- Clean up any hidden lines; laser cutters follow visible paths only.
- Use the “Export Entities” tool to flatten complex curves into laser-friendly vectors.
Adobe Illustrator
- Import DXF or SVG files to adjust vector paths easily.
- Use the “Simplify Path” tool to reduce anchor points and smooth curves.
- Check all paths are set to stroke and not fill—laser cutters trace strokes.
- Export final files as AI, SVG, or PDF, compatible with most CNC laser cutting services.
Inkscape
- Free and versatile for laser cutting prep.
- Import DXF or SVG files and use the “Path > Simplify” feature to reduce complexity.
- Convert text to paths to avoid font issues.
- Save files as SVG or PDF formats widely accepted by laser machines.
These software tips can help you get clean, laser-ready vector files without frustration. If you use Fusion 360, SolidWorks, Adobe Illustrator, or Inkscape, following these steps ensures smooth exporting and better cutting results.
Why Choose HYCNC for Laser Cutting
When it comes to laser cutting, HYCNC stands out for several reasons that make the whole process smooth and reliable for you.
Seamless File Upload
Uploading your vector files is quick and easy with HYCNC. Their system accepts a wide range of formats designed for laser cutting file preparation, so you don’t have to worry about file compatibility. Whether you’re exporting DXF files from Fusion 360 or vector files from Adobe Illustrator, HYCNC makes sure your files are handled right from the start.
Precision Cutting
HYCNC uses top-tier CNC laser cutting services that ensure every detail in your 2D vector files translates perfectly onto your material. This precision helps reduce material waste and guarantees clean, accurate cuts every time — an essential factor when working with complex shapes converted from 3D models.
Expert Support
If you’re new to converting 3D models to 2D vector files or optimizing files for laser cutting, HYCNC’s team provides expert support. They can guide you through common challenges like node overload or material considerations, making your project hassle-free.
Call to Action
Ready to get started? Upload your files today and experience precise, reliable laser cutting services designed to bring your 3D-to-2D laser cutting projects to life. For more insights on file preparation and material choices, check out our guide on sheet metal cutting contrast shearing vs laser cutting and see how HYCNC can help you achieve top quality every time.
FAQs
How do I convert 3D models to 2D vector files for laser cutting?
Start by creating or importing your 3D model in software like Fusion 360 or SolidWorks. Then, extract 2D sketches or flat patterns from your 3D shape and export those as DXF or SVG files, which are common vector formats for laser cutting.
What file formats work best for laser cutting?
DXF and SVG are the most widely accepted vector file formats for CNC laser cutting. These formats keep the design clean and scalable for precise cutting.
Can I use Adobe Illustrator or Inkscape to prepare laser cutting files?
Yes, both Adobe Illustrator and Inkscape are great for editing and optimizing vector files before sending them to a laser cutter. You can import DXF or SVG files, clean up lines, and adjust paths for better results.
Why is exporting clean vector files from 3D shapes challenging?
3D models often have too many nodes or complex curves that don’t translate well into 2D cutting paths. This can cause messy cuts or errors, so simplifying the design and checking file quality is essential.
How can I optimize vector files for laser cutting?
Keep lines simple and closed, reduce node count, remove overlapping paths, and double-check dimensions. Most software has tools to optimize paths automatically or manually.
Does HYCNC support direct file uploads for laser cutting?
Yes, HYCNC offers seamless file uploading with support for common vector formats, ensuring your files are ready for precise CNC laser cutting with expert support throughout.
Can I get help if I’m not sure about my file?
Absolutely. At HYCNC, expert support is available to review your files, suggest improvements, and make sure you get the best results from your laser cutting project.